

Custom Objects are one of the more powerful tools in Eloqua – they open the door to all kinds of interesting and useful capabilities. While Custom Objects have multiple use cases, the focus of this blog post will be on one of the most common uses – capturing data from a form submit.
A Custom Object (commonly referred to as a “CDO”) is a simple table, like one you might create in Word or in Excel. A CDO has columns, which you define when you set up the object, and rows, which can be added using a variety of methods (forms, program steps, etc.). The structure of CDOs makes them a flexible storage mechanism in Eloqua for all types of data.
The data in CDOs are mapped (linked) to specific contact or account records, usually by matching an email address or Account ID to a corresponding value within the CDO. The relationship between the contact or account record to the CDO record can be either one-to-one or one-to-many. That is, each contact or account record can be associated with one CDO record, or with several. For example, a one-to-one relationship is appropriate when you’re using the CDO to add additional custom fields beyond the 250 that you are allowed in the contact table. A one-to-many relationship is called for when you want to record things that may happen multiple times for a single contact or account, e.g. purchases, events attended, or form submissions. Keep in mind that Eloqua doesn’t allow you to set up many-to-one relationships between contacts or accounts and records in a CDO.
Form submissions often contain information that is transient, for example, data related to an event. You wouldn’t want to clutter up the contact record with custom fields to hold data that is only going to be used for a little while, and sometimes you want to be able to track more than one form submission for a particular contact. The ability to set up “one-to-many” relationships between contacts and CDO records lets you keep as many form submissions as you need for a particular contact. More importantly, when you keep data in a CDO, you can still use that data for segmentation or for personalization, just as if it was a custom field on the contact record.
With that background, let’s go through the steps needed to create a CDO and set it up to record data from form submissions.
First, you need to create a form. Take a moment to think about the fields on the form. Certain fields such as first and last name, company, email address will directly link to fields on the contact record. These fields should be used to update the contact record itself. You will also have form-specific fields, and these are the ones that you would store in the CDO. In general, here are the fields that you can include in your CDO:
- Email address. This will be used to link the CDO record to the contact record.
- Copies of fields that will help you identify the contact record when looking at CDO records. You don’t want to duplicate too many fields from the contact record on the CDO, but a few (e.g. name, company) of them can make it easier to work with CDO records.
- Semi-permanent fields. Any fields that don’t need to be stored permanently on the contact record.
Here are the steps to create a CDO for form submissions.
1. Choose Custom Objects from the Contacts menu at upper right:
2. This brings up the Custom Objects page. Click New Custom Object in the area under the blue header in the middle of the page. This brings up the Custom Object Details window: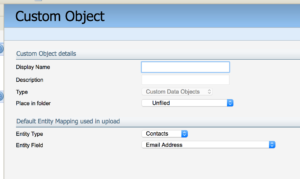
3. Give your object a name following your organization’s standard naming convention. Add a description and choose or create the appropriate folder.
4. Leave the Entity Type set to “Contacts” and the Entity Field set to “Email Address”. Click Next at lower right. This brings up the Custom Object Record Fields screen.
5. Click Custom Object Record Fields > Add Form Fields at upper right. Select your form in the menu that is displayed, then click Select. The Add Form Fields to Custom Object window is displayed: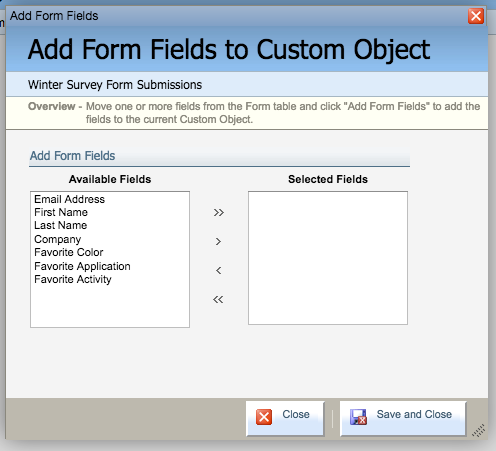
6. In the Available Fields list on the left, select the fields you identified earlier to add to the Custom Object. Control-click or command-click to select multiple fields, then click the > button in the middle to move them over to the Selected Fields list on the right: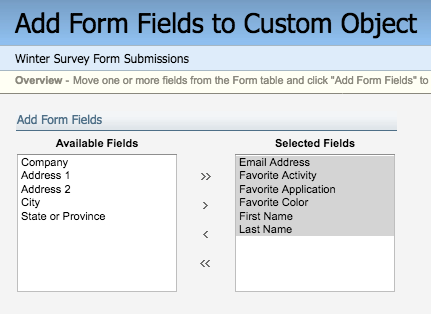
Review the list of fields to make sure you haven’t missed anything, then click Save and Close at lower right.
7. Click Next at lower right, then Next again. This takes you back to the Custom Object Details screen, with some new fields available: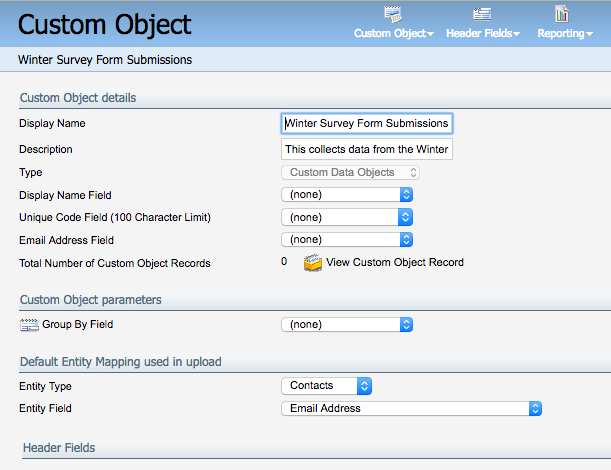
8. If you want to keep track of multiple form submissions for anyone who submits a form, leave the Unique Code Field and Email Address Field menus set to “(none)”. If you only want to track most recent form submissions, set both fields to "Email Address".
There! You’ve created a Custom Object! Now let’s link it to the form. We’ll use a form processing step to write the form submission data to the CDO. Here are the steps to add and configure the form processing step.
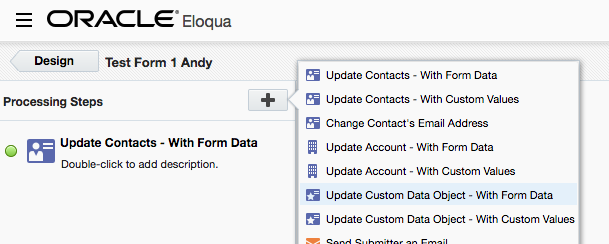
- Open your form, then click the blue Processing button at upper right.
- Click the plus sign to add a new step, then choose Update Custom Data Object – With Form Data from the menu and drag it to the list of processing steps on the left. Make sure you don’t accidentally choose Update Custom Data Object – With Custom Values just below this – it’s easy to choose the wrong one.
- Click the processing step in the list at left. This allows you to configure the step’s settings.
- Choose your Custom Object in the Choose a Custom Object… menu, then choose “Email Address” as the Key Field if you want to track the most recent form submission. If you want to track multiple submissions, leave this field blank.
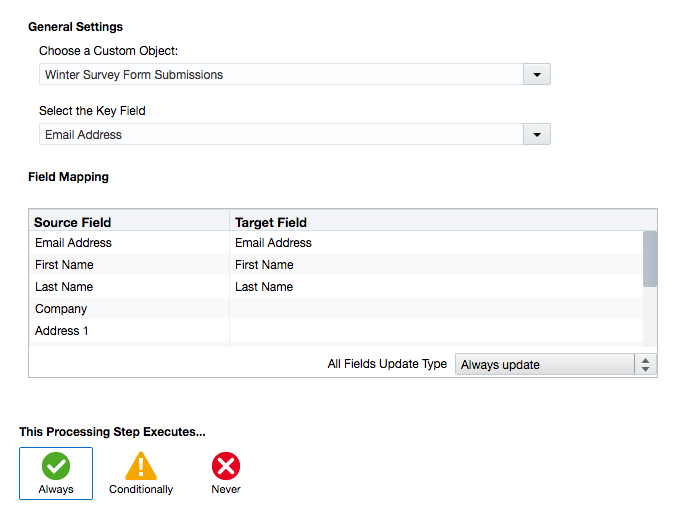
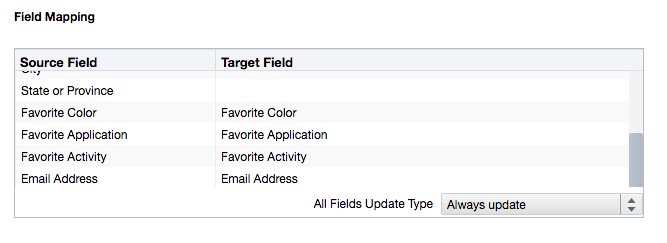
- Scroll down the list in the Field Mapping display and confirm that the Source Fields from the form are mapped properly to the Target Fields in the Custom Object. These should auto-map, since we created the fields directly from the form, and the field names are the same in both.
- Make sure that This Processing Step Executes… is set to “Always”.
- Click Save at upper right.
You have now established a link between the form submission and the CDO. Before we go any further, test your setup. Here’s a quick way to do that:
- Open up the landing page that contains your form. From the Eloqua Landing Page editor, click the URL at the top of the page, then click the link in the box that opens up. This should open your landing page in your browser (i.e. not in the Eloqua landing page edit UI), with the form showing.
- Fill out the form with some sample data and submit it.
- Go to the Custom Objects page (Contact > Custom Objects) and open your Custom Object. You should be able to select it quickly from the My Recent Items list at upper left.
- The Custom Object window displays. If things worked properly, you will see a Total Number of Custom Object Records entry in the middle of the page (highlighted in red below). If this is your first test, it should show 1 as the number of records.

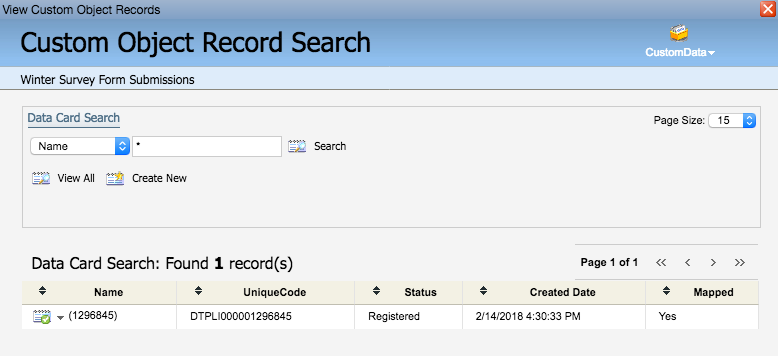
- Click View Custom Object Record to open up a list of records in the Custom Object. This brings up the Custom Object Record Search screen. You should see one (or more, if this is not your first test) records displayed. The record should show a “Yes” in the Mapped column at right:
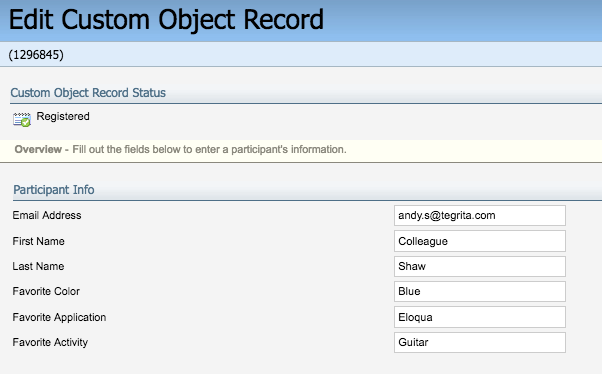
- Click on the row showing your test record. The custom record is now displayed in an edit window, and you should see the data that you entered in the form earlier:
- If you set up the Custom Object to track multiple form submissions for every contact, go back to step 2 and submit another form using the same contact. Then check your Custom Object to make sure that a second record was added, rather than overwriting the first record.
If you achieved these results the first time through, then congratulations! If, however, you find that things didn’t go exactly right, here are some things to check:
- No record added to the Custom Object: This indicates that the linkage between the form and CDO is not set up correctly. There are several ways this might have gone astray:
- Did you remember to Save after adding the form processing step? Make sure you’ve saved those changes, then re-test.
- Make sure that you selected the correct CDO when setting up the Form Processing step.
- Make sure that you selected Email Address as the key field in the form processing step configuration.
- Make sure you didn’t set the processing step up as Conditionally executed. If there was a reason that you needed to do this, make sure that the condition is defined appropriately.
- Custom Object record added but data is missing: Check the field mapping configuration in the Form Processing step and make sure all the Content Object fields have been correctly mapped from the form:
- A second test overwrites data in the Custom Object rather than adding a new record: If you wanted to record multiple form submissions in separate CDO records, and you are not seeing a new record created for a second form submission, check the Custom Object Details. You may have inadvertently set either the Unique Code Value and Email Address fields to "Email Address", rather than "(none)". Both fields need to be set to "(none)" to allow the one-to-one relationship I discussed earlier. Unfortunately, you cannot change these attribute once records have been added to a CDO. You don’t have to start from scratch to fix this, though. Just select your CDO and copy it:
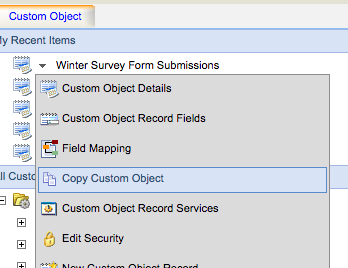
This copies all the other attributes of the CDO (fields, etc.) but lets you set the Unique Code Value and Email Address fields properly. Make sure that these fields in the Custom Object Details are set to “(none)”, then save. You will have to reconfigure the processing step in your form so that it points to the new Custom Object, then be sure to retest.
If these fields were set up properly in the CDO configuration, check your Form Processing Step. The Key Field should have been left blank to allow for tracking of multiple submissions. If you set this incorrectly, you'll have to delete the processing step and add it again.
Test, test, test, before you go live with your changes. When your tests succeed, that’s it! You are all set and, on your way, to leveraging Custom Objects in Eloqua. If you need help with Custom Objects or want to learn more about how to effectively use them, contact us today.
About the Author
More Content by Andy Shaw


![The Channel CRO [It’s What You Do with Brandi Starr]](https://content.cdntwrk.com/mediaproxy?url=https%3A%2F%2Fcontent.cdntwrk.com%2Ffiles%2FaHViPTgyNTIzJmNtZD1pdGVtZWRpdG9yaW1hZ2UmZmlsZW5hbWU9aXRlbWVkaXRvcmltYWdlXzY0ZTUwZDRkNzUxNGYucG5nJnZlcnNpb249MDAwMCZzaWc9YjM2ZWY5ZDVhNjUwY2RhMTNkMzM1MTY4OTFjNTY0YTI%25253D&size=1&version=1692732949&sig=896a21890cb589e6d4caf2b1fd16150f&default=hubs%2Ftilebg-blogs.jpg)

![Rebel Intrapreneur [Episode 45: Brandi Starr A New Generation of Executive]](https://content.cdntwrk.com/mediaproxy?url=https%3A%2F%2Fcontent.cdntwrk.com%2Ffiles%2FaHViPTgyNTIzJmNtZD1pdGVtZWRpdG9yaW1hZ2UmZmlsZW5hbWU9aXRlbWVkaXRvcmltYWdlXzY0YjA0OTUzMGIxZjUucG5nJnZlcnNpb249MDAwMCZzaWc9NjA1NDQ3YzNjZWYyOTkxYTY2MzgxODllMmU1ZmE0MTE%25253D&size=1&version=1695053332&sig=cd24ad7dc68bc455ce6258472b49f26b&default=hubs%2Ftilebg-blogs.jpg)

![Spamming Zero Podcast [E 51: How To Conquer Communications In Marketing Operations]](https://content.cdntwrk.com/mediaproxy?url=https%3A%2F%2Fcontent.cdntwrk.com%2Ffiles%2FaHViPTgyNTIzJmNtZD1pdGVtZWRpdG9yaW1hZ2UmZmlsZW5hbWU9aXRlbWVkaXRvcmltYWdlXzY0NzdhOTk1YzdkMzcucG5nJnZlcnNpb249MDAwMCZzaWc9NTE1MmZkNGM1YmU1MTg1NDdiNjczOTQ3NDE3MjhkNzE%25253D&size=1&version=1688062578&sig=de26b17088ca14016cb182437cfb42d2&default=hubs%2Ftilebg-blogs.jpg)
![The Adaptive Executive Podcast [E 32: Using Language of Service with Tegrita’s Rolly Keenan]](https://content.cdntwrk.com/mediaproxy?url=https%3A%2F%2Fcontent.cdntwrk.com%2Ffiles%2FaHViPTgyNTIzJmNtZD1pdGVtZWRpdG9yaW1hZ2UmZmlsZW5hbWU9aXRlbWVkaXRvcmltYWdlXzY0NWUzYzczMWI0NDAucG5nJnZlcnNpb249MDAwMCZzaWc9MDA1ZTgzYTc4YWRkMmQzODAyOGYzM2ZkMmU1N2I3ZGE%25253D&size=1&version=1683901167&sig=d468c97df1ecadd8226dc4e37393f7fd&default=hubs%2Ftilebg-blogs.jpg)


