

In this blog, we delve into two sophisticated Eloqua Insight capabilities that might be new additions to your toolkit– Bins and Calculated Measures. These advanced features empower you to enhance your data analysis by creating custom columns in Insight reports. By applying logic, math, text and other calculation types, you can tailor your data views to meet specific business needs more effectively.
Note: This article assumes you have a foundational understanding of Eloqua Insight, including how to create and edit reports.
Bins
Insight bins allow you to categorize data into groups or “buckets” of values that are defined by a rule that you control. This functionality enables you to consolidate multiple values into a single group, and then use that group value in a row or column. Here are a few scenarios where bins can enhance your report’s effectiveness:
- Regional reports: Let’s say you have a report where you want to show results by region, but your data doesn’t include a specific Region As long as you have another field that you can use to define the regions (e.g. the State or Province field), you can use the Bins feature to create reports by regions that you define based on that other field.
- Test campaign reports: Another place where you might want to use bins is when you are reporting on a campaign that tests two different paths with different emails. You could create bins based on different Email Name values to show results broken out by the different test paths instead of by email name.
Let’s see how the latter example might work. In this example, you’d probably start with a standard email report and customize it for your test campaign. Follow these steps:
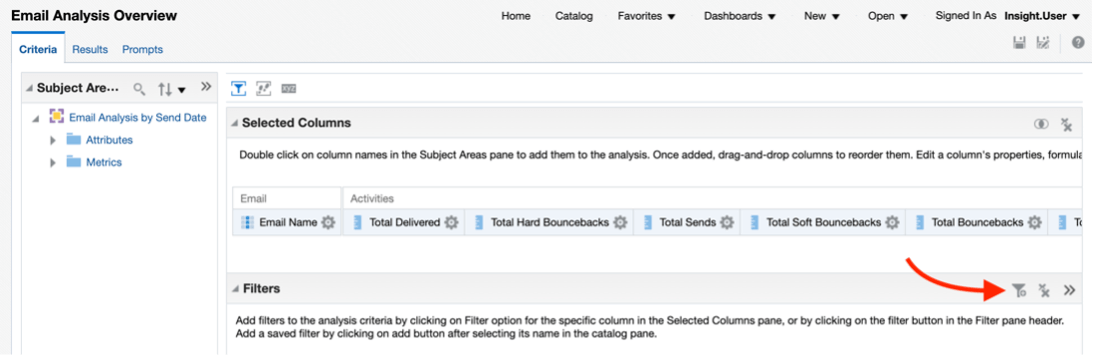
- Log into Eloqua Insight and open the Email Analysis Overview report for editing.
- Click the Save As icon at upper right and save the report with a new name and into the appropriate folder.
- Delete the standard filters and prompts that come with the Email Analysis Overview
- Add a filter to narrow down the report results to your test campaign. Click the Add a Filter icon at the right, then click More Columns… at the bottom of the menu that pops up.
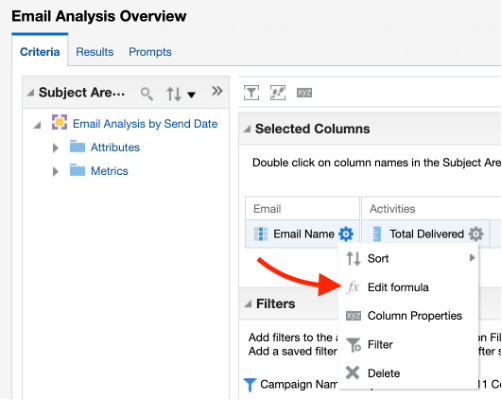
In the Select Column dialog that appears, choose Attributes > Campaign > Campaign Name and then select your campaign to narrow results to the test campaign. - If you click on the Results tab now, you’ll see results broken out by Email Name. But we want to see results by test path or group. To do that, let’s change the Email Name column so that it shows based on the test path taken rather than individual email names. Since this campaign uses different emails on the different test paths, we can use those names to define the test group.
- Go back to the Criteria Click the gear icon next on the Email Name column and choose Edit Formula from the menu that pops up:
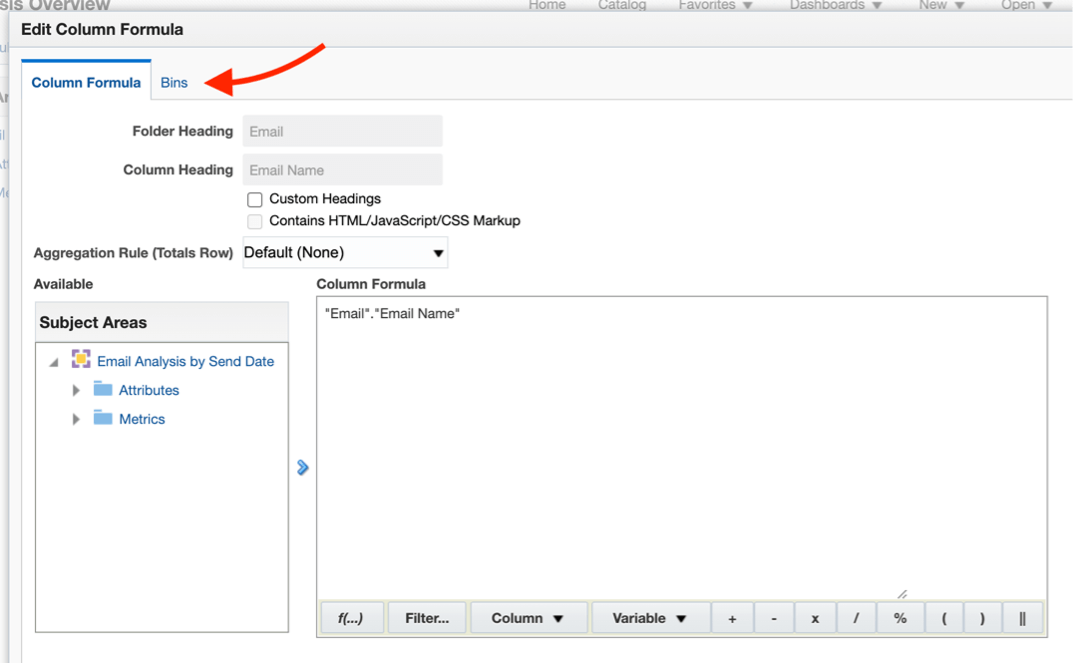
- Click the Bins tab at the top of the Edit Column Formula window, then click the Add Bin button at lower left:
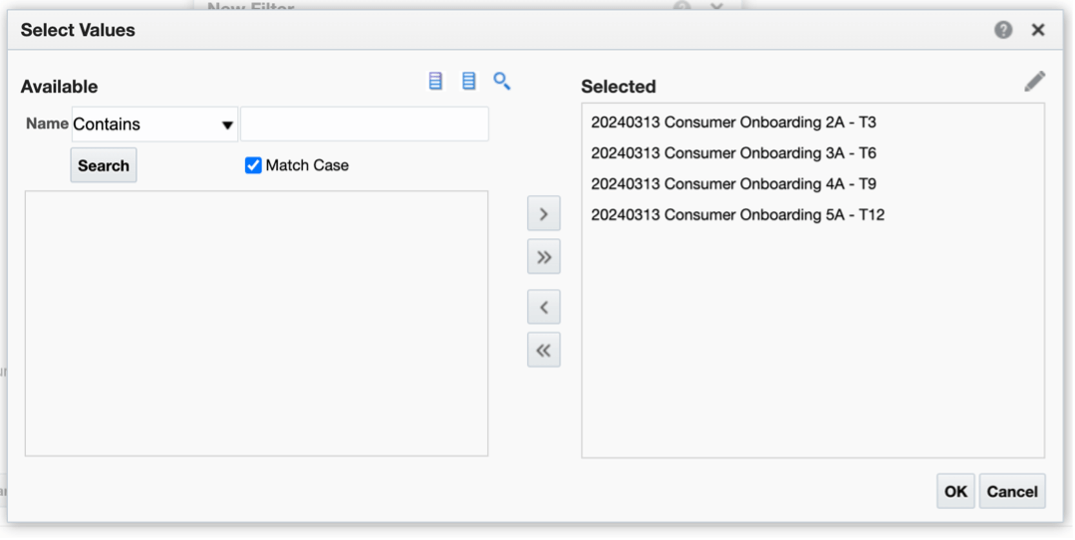
- In the New Filter dialog that appears, click the triangle at the right side of the Value box, then click More/Search at the bottom of the resulting menu. In the Select Values dialog that appears, search for the Email Name values that constitute the initial test path in the campaign. Once you’ve selected all the emails on the test path, click OK twice and give the Bin a name, e.g. “Test Group A”.
- Repeat the process for the next test group, clicking the Add Bin button to start the process. If additional test groups are needed, set up a bin for each one. If you like, you can set up another bin to cover any Email Name values that you missed.
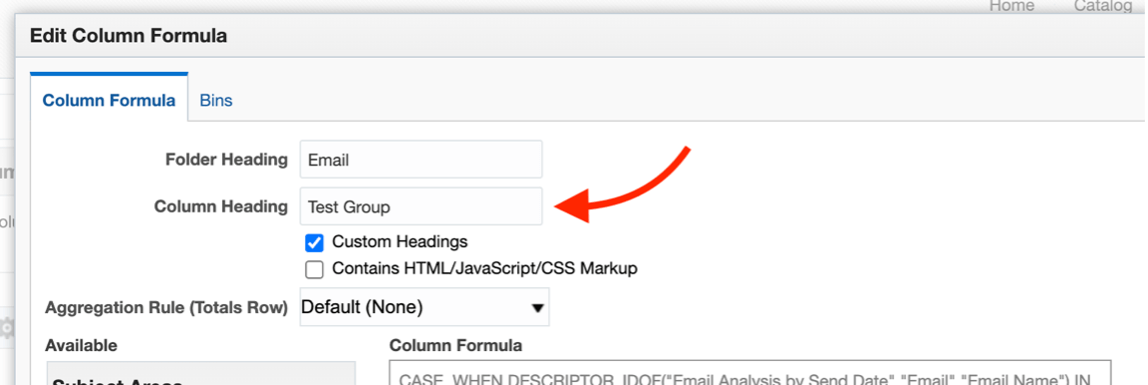
- Before clicking OK to exit the Edit Column Formula dialog, click the Column Formula tab and enter a new name into the Column Heading field, e.g. “Test Group” after you’ve set up your bins:
- When you’re done, click OK to save your changes to the column formula.
- Open the Results tab to check your work. You should see test group names in the relabeled Test Group column now. If email names are still showing up, you may have missed them in your test group definitions.
This technique can be generalized and used to create groupings of values for any column in an Insight report. It gives you the flexibility to create customized groupings of data in your Insight reports. Try it and you’ll see that this is a powerful tool!
Note: If you come back to edit your Bin definitions, and click Edit Formula for the Test Group column, you’ll see a hard-to-decipher formula in the Column Formula area. Don’t worry about this; if you need to make changes to the bins, just click the Bins tab and use the interface provided by Insight to add, delete, or edit bin definitions.
Calculated Measures
Calculated measures enable you to use math, date, text, or other operations to create new columns in your report. If you’re familiar with crafting formulas in Excel, you’ll find the process of creating calculated measures in Insight similar, slightly more complex.
For our example, let’s see if we can calculate an Age value based on birthdate. While there are a variety of ways you might calculate this number, a straightforward approach is to calculate the number of years since their birthdate. Let’s see how we’d set up this calculation in Insight.
The process for creating a calculated measure starts out the same way as creating bins – you click the Edit Formula option for an existing field (this calculation assumes that you have a Birthdate field in your database). Before we start, let’s take a closer look at the Edit Formula dialog. Here’s what it looks like.
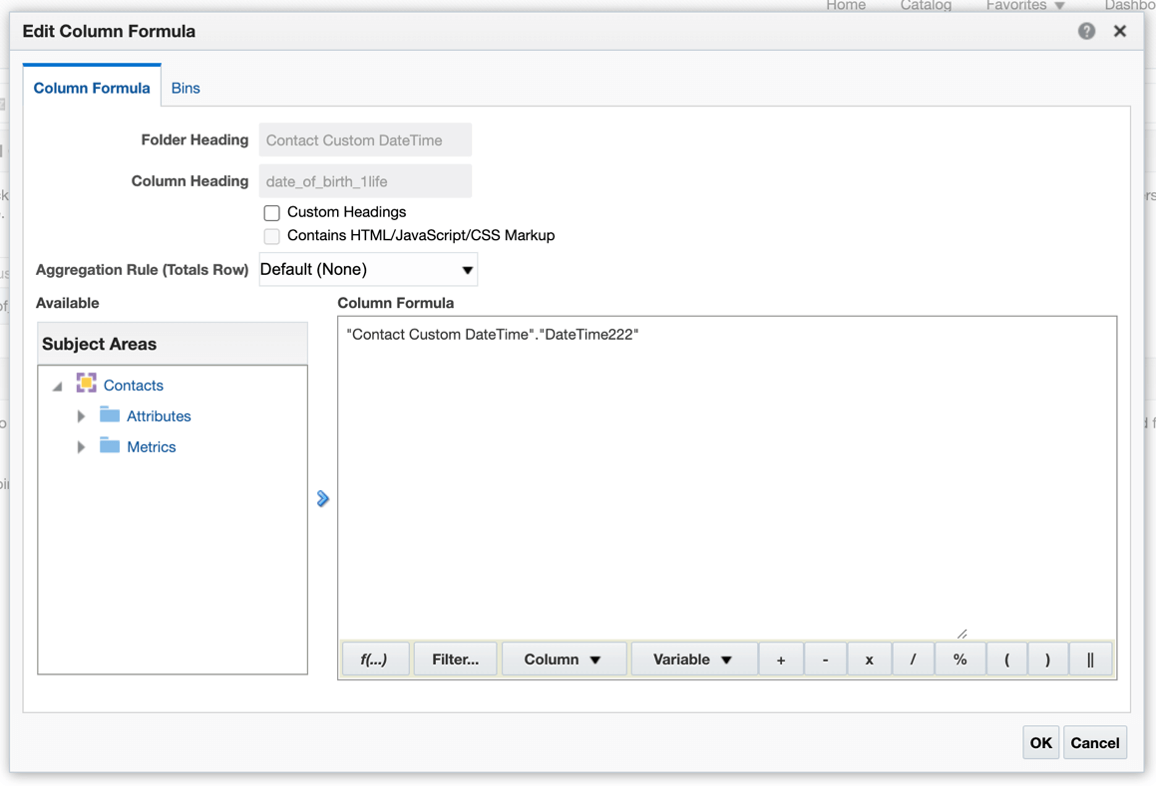
Here are some of the important parts of the dialog:
- The Column Formula box on the right is where you’ll do the work of setting up a formula. You can edit the formula directly or use the buttons below the formula box to construct the formula.
- The Subject Area box on the left allows you to find additional fields that you want to use in your formula. Just find the field, select it, and then click the “>” button to the right of the Subject Area The field reference will be copied to wherever you have placed the insertion point in the Column Formula box.
- The function button at the left of the row of buttons, labeled “f(…)” gives you access to Insight’s built-in formulas. We’ll use these to set up our age calculation. There are many different formula types and it’s worth your time to browse through the built-in functions to understand what is available and get a sense of how they work. These functions are similar to Excel’s built-in functions.
Here are the steps to create our “Age” calculated measure.
- Begin by dragging out the Birthdate field to your report. Then click on Edit Formula from the gear icon.
- We want to subtract the current date from the birthdate, and then remove the fractional portion. To subtract the current date from the birthdate field, we need to use one of Insight’s built-in functions, TimestampDiff(). Click the function button, scroll down to the Calendar/Date folder, open it, scroll down again to TimestampDiff and select it. You’ll see a summary of what the function does just below. This function takes three arguments:
- The interval, that is, what time unit do you want the results to be shown in? We want years, so, based on the description, we will specify “SQL_TSI_YEAR” as the interval.
- The expr indicates the date from which we will be subtracting. In this example, it will be the birthdate.
- The timestamp2 value is the date you want to subtract from the date noted above. Here, we want to subtract the current date, which is noted by entering “CURRENT_DATE”.
- To build the formula, make sure that TimestampDiff is selected, then click OK. You should see something like this in the Column Formula window:
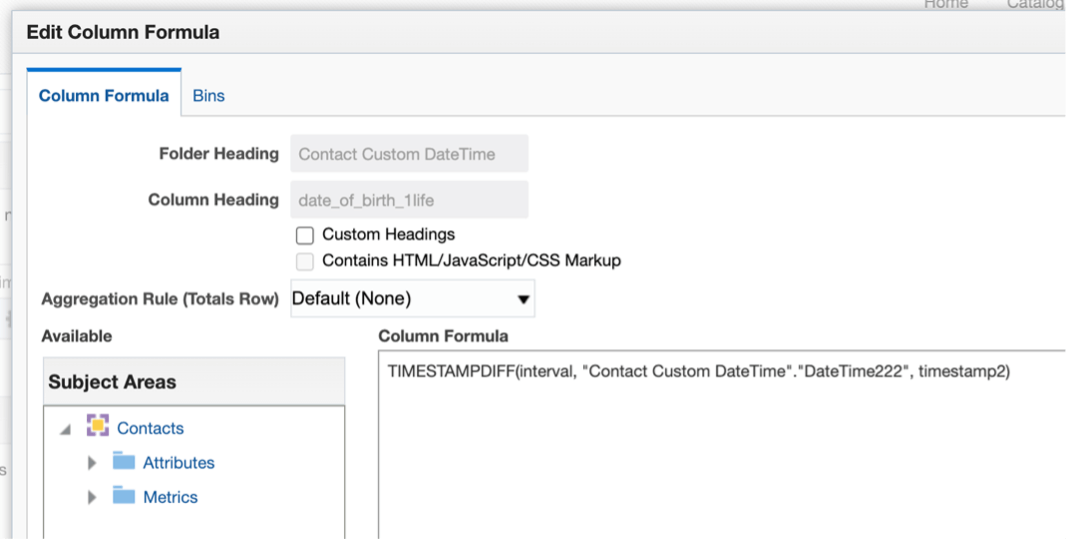
Insight assumed that you wanted to subtract another date from the current field, and set up the current field as the second argument for the function, which is just what we wanted. - Double-click interval to select it, and then enter “SQL_TSI_YEAR”. Make sure to enter in upper case, Insight is picky and won’t accept mixed case or lower case here.
- Double-click timestamp2 to select it, then enter “CURRENT_YEAR”. Again, make sure you enter the value in all upper case. Your formula should look like this:

- You can now build the rest of your report depending on your requirements. For a count of contacts by age, drag out the Total Contacts field from the Subject Area panel on the left.
- Go to the Results tab and check your results. Here we can see the count of contacts by the Age value we’ve calculated. Happily, the TIMESTAMPDIFF function returns integer values, so we don’t need to do any rounding or other math to remove partial years from the results.
This is one example of the possibilities available when utilizing calculated measures with Insight’s built-in functions. You can explore a diverse range of functions and operations to build tailored calculated measures:
- Basic math operations like add, subtract, multiple, and divide.
- More complex math operations like average, maximum, minimum, rounding, absolute value, trig functions, and more.
- String operations like concatenation, upper/lower case, find, left/right/middle substrings, and more.
- Date operations
- Type conversions (e.g. numeric to text, with formatting options)
- Complex logic using “Case” statements
Here are key considerations when creating new calculated measures:
- Just like Excel, Insight is very picky about the placement of parentheses. Be sure that you review the placement of parentheses in your formula and that you aren’t missing or adding extra parentheses.
- Evaluation is from right to left within the formula, or within any parenthetical sub-expression within the overall formula.
- Insight is quiet strict about mixing field types. In particular, it makes some distinctions between numeric field types (integer and others). In some cases it may be necessary to use the CAST function to convert from one field type to another to get the results you’re looking for.
- Googling for “OBIEE <function-name> <your question>” can sometimes lead to useful discussions on various publicly available forums.
Here are some helpful documentation links:
- Documentation for the Column Formula dialog can be found here.
- The Bins tab is documented here.
- The various SQL functions, covering date, math, text, type conversion, and other functions can be found here.
Empower Your Reports
This guide to Bins and Calculated Measures equips you with the tools needed to significantly enhance your reports using Eloqua Insight. Feel free to experiment with these capabilities and don’t hesitate to reach out with any questions or for further assistance!

![Revenue Rehab EP 126 [Visionary Leadership: The CMO’s Market-Driven Journey to CRO w/ Latane Conant]](https://content.cdntwrk.com/mediaproxy?url=https%3A%2F%2Fi.ytimg.com%2Fvi%2FyJE5GXP-LMk%2Fhqdefault_live.jpg&size=1&version=1727822803&sig=4a5c0c2fb68a12a50f0cd53a4ba2d6ac&default=hubs%2Ftilebg-videos.jpg)


![More Perfect Marketing EP 241 [Middle of the Funnel Marketing Excellence with Brandi Starr]](https://content.cdntwrk.com/mediaproxy?url=https%3A%2F%2Ftegrita.com%2Fwp-content%2Fuploads%2F2024%2F10%2FVID1-1.jpg&size=1&version=1730128302&sig=8fef98b9c6e8f297004470db91cb4df4&default=hubs%2Ftilebg-videos.jpg)


![Revenue Rehab EP 114 [Brave Creatives: The Importance of Risk-Taking in Marketing]](https://content.cdntwrk.com/mediaproxy?url=https%3A%2F%2Fi.ytimg.com%2Fvi%2FEfgGqLcP378%2Fhqdefault.jpg&size=1&version=1727823255&sig=dcb12084bd013725a7aae4d336304fa7&default=hubs%2Ftilebg-videos.jpg)
![Revenue Rehab EP 95 [Email ROI Unlocked: Unraveling Insights from Litmus's Report with Jaina Mistry]](https://content.cdntwrk.com/mediaproxy?url=https%3A%2F%2Fi.ytimg.com%2Fvi%2FtOYRjswfC_4%2Fhqdefault_live.jpg&size=1&version=1708551624&sig=344f119a2b3d9e6f9ffa1cc583e7a259&default=hubs%2Ftilebg-videos.jpg)


